
Key Takeaways
- UV-C employs a focused ultraviolet spectrum that deactivates microbes by breaking down DNA and RNA, which is why it’s so effective at eliminating mold, bacteria, and viruses within HVAC systems. For best results, install lamps where they can illuminate coils or airstreams.
- For coil sanitizing lights, position them directly above or adjacent to the evaporator coil. For airstream lights, install them in supply or return ducts to address surface and airborne contaminants, respectively. Why not both?
- Match lamp intensity, number of lamps, and placement to airflow velocity, system temperature, and humidity to maintain germicidal effectiveness. Measure airflow to select appropriate UV output.
- Pair UV-C with good filtration, frequent filter changes, increased ventilation, and frequent coil cleaning. UV-C doesn’t actually eliminate dust, particulates, or chemical odors.
- Of course, adhere to rigorous safety and installation practices by shutting off power, employing shields or interlocks to prevent exposure, grounding and wiring to code, and having a pro evaluate complicated or commercial systems.
- Maintain UV systems with monthly operation checks, cleaning of lamp surfaces, scheduled bulb replacements every 12 to 18 months, and a documented maintenance log to ensure continued performance.
UV light placement in HVAC system refers to where ultraviolet lamps are installed to reduce microbial growth and improve air quality.
Optimal placement typically focuses on the coil and the air stream adjacent to the return duct to inhibit mold on damp surfaces and reduce airborne microorganisms.
Good layouts deploy lamp spacing and wattage that match coil size and airflow.
The sections below provide specific instructions on location, safety, and maintenance for optimal outcomes.
Understanding UV-C
UV-C is a subset of the ultraviolet band, centered approximately between 100 nm and 280 nm, that’s used in HVAC for germicidal control. A nanometer is one billionth of a meter and in this band the DNA and RNA of microbes absorb energy most readily. The typical frequency for HVAC disinfection is around 253.7 nm, where nucleic acids absorb ultraviolet energy and experience the most damage.
Far-UVC at approximately 222 nm is a newer class that appears promising for occupied spaces, while vacuum UV below 200 nm can generate ozone, something to be avoided in most HVAC contexts.
The Mechanism
UV-C lamps are short-wave, which penetrate microbial cell walls and photo-damage nucleic acids, breaking bonds and creating thymine dimers in DNA or corresponding lesions in RNA. Those lesions block replication and inactivate the organism rather than physically “killing” it in a classical sense.
Germicidal UV light targets pathogens in the air stream and on surfaces along the HVAC path, including coil faces, drain pans, and duct walls, where spores and biofilm adhere. Continuous UVGI systems maintain a constant dose that prevents regrowth and decreases microbial burden between service visits.
UVGI systems use lamp intensity, exposure time, and proximity to their target to determine dose. A high-intensity lamp near a coil requires less time than a low-intensity lamp at a distance. UV-C doesn’t rely on chemicals, so it avoids residue and chemical handling, making it a clean choice for indoor air care.
The Purpose
The objective of UV-C in HVAC is to reduce populations of mold spores, bacteria, and viral particles that accumulate on coils and in ducts. If coils remain biofilm-free, heat transfer is enhanced and the unit consumes less energy over time.
UV-C slashes allergens and musty odors by stopping mold before it starts growing, which can enhance occupant comfort and lower complaint rates. Internal components that stay cleaner tend to give fans and heat exchange surfaces a longer working life, minimizing maintenance.
Systems are sized and positioned to correspond with airflows and hit danger zones. For instance, one lamp over a drain pan and a few across a coil panel provide more coverage than one lamp hidden inside a return plenum.
The Spectrum
Ultraviolet light spans from approximately 0 nm to 400 nm on the electromagnetic spectrum and divides into UV-A, UV-B, and UV-C. Exclusive UV-C, particularly the region around 254 nm, is generally applicable for germicidal purposes in HVAC.
| Band | Wavelength (nm) | Typical use |
|---|---|---|
| UV‑A | 315–400 | Tanning, aging studies |
| UV‑B | 280–315 | Vitamin D synthesis, limited disinfection |
| UV‑C | 100–280 | Germicidal irradiation (optimal ~254 nm) |
UVA and UVB won’t provide those same air-quality advantages. Overexposure to them has various risks and minimal germicidal impact. Ozone generation may occur with wavelengths below 200 nm. Therefore, select lamps and ballast systems that reduce vacuum UV output.
Optimal Placement
The more strategically you place UV lights in your HVAC systems, the more effective they will be in reducing microbial growth and improving air quality. Get the unit layout and mark coil type, airflow paths, and moisture-prone areas before selecting a location. The most popular locations are evaporator coils, supply and return ducts, and immediately upstream of air filters. Each location has a different function and fits different system configurations.
1. Coil Sanitization
Place coil UV lights directly above or adjacent to the evaporator coil to bombard mold-growing wet surfaces. For N-shaped coils, position the lamp above or below the coil and nearer to the drip pan, as moisture collects and nourishes biofilm there.
Coil lights shine directly on surfaces, so they eliminate microbial buildup on fins and drain pans and help return heat exchange efficiency.
Tip: Use aluminum foil tape to secure compact fixtures in metal ductwork and reflect UV toward shaded coil regions. Coil sanitizing lights are most effective in homes where there is stubborn mold, chronic moisture, or visible coil contamination.
2. Airstream Disinfection
Airstream UV lights are installed within primary supply or return ducts where the air flow carries pathogens through the irradiated zone. Duct-mounted UVGI attacks airborne microbes prior to dissemination around rooms and reduces overall exposure.
For larger systems and office buildings, duct UV purifier systems are sized for duct cross-section and air velocity. Check lamp intensity and airflow velocity.
Short exposure at high speeds reduces kill rate, so choose lamps and spacing that provide adequate dose given the system’s cubic metres per second.
3. Dual-System Approach
Coil and duct UV lamps can be combined for surface and airborne control when risks are mixed. A dual setup couples a coil lamp to keep fins and drain pans clean with duct lamps for circulating pathogens.
Aside from providing optimal placement, the benefits are improved indoor air quality, less coil cleaning, and longer system life. Sensitive sites such as clinics or schools would still choose dual systems after a site layout review and dose calculation.
4. System Variations
Tailor placement by system: Split systems usually accept coil lamps in the air handler. Packaged rooftop units may require lamps adjacent to coil banks or inside large ducts.
Mini-splits necessitate external coil-focused units. Flexible ducts alter mounting possibilities and may require stiff mounting plates or external housings.
Consult the HVAC manual and brand notes for compatibility and suggested mount points. A bad location decreases efficiency and can increase ozone hazards, so always think about airflow, coil geometry, and moisture in the air prior to finalizing placement.
Installation Insights
Installation plays a critical role in both achieving the anticipated performance and maintaining safety for users and equipment. UV lamps need to be properly sized, located, and wired. An improperly positioned lamp can reduce effectiveness by 50 percent or more.
The average installed cost is between $250 and $800, and most installs require only 1 to 2 hours with little system downtime. The initial part is selecting from coil or air sterilization types and matching lamp output and lifespan, which is roughly between 9,000 and 12,000 hours, to the application.
Professional Assessment
Let a reputable HVAC company evaluate the system size, duct layout, air flow rates, and existing indoor air quality targets. An upfront installation inspection locates the optimal mounting points adjacent to the coil, in the return-air plenum or inside ducts, steering clear of heat-sensitive components.
Pair a coil clean with your UV install to eliminate biofilm and expose the lamp to a clean surface that enhances results. For commercial systems or complicated duct runs, work with a licensed HVAC technician who can size multiple lamps, provide ballast placement advice, and offer local code confirmations.
Electrical Safety
De-energize the HVAC unit before work and use lockout-tagout if you can. Employ correctly rated wire insulation, rated connectors, and strain reliefs to prevent loose connections.
All kits should be grounded and meet local codes. Ballasts and power ratings should be verified as matching system voltage. Do not mount lamps where drip or spray is present and where it could short if water collects.
Material Integrity
Inspect adjacent plastics, rubber seals, wire jackets, and insulation for UV sensitivity. Certain non-metallic components can become brittle or discolor with extended UV exposure.
Use UV-resistant components or install shields to block strays. Check duct lining and insulation for compatibility. Replace or protect any surfaces that may be compromised. Never let lamps shine directly on wire insulation, plastic component fittings, or flexible ducts. Simple metal guards or louvers control stray irradiation.
- Steps for a successful DIY installation:
- Select the correct UV system type for coil or air sterilization and check lamp hours.
- Read the manufacturer manual and confirm the kit matches your HVAC model.
- Turn off and lock out power to the unit before any work.
- Mount the lamp in the recommended location and secure it with the provided hardware.
- Wire to the ballast using proper connectors and ground the system.
- Install a safety sight glass to view the blue glow without direct exposure.
- Test lamp function, verify airflow, and note the bulb replacement schedule of nine to twelve months.
- Keep records of the install date, lamp hours, and maintenance.
Installation Insight – Follow manufacturer instructions and hire a qualified technician for complex installs or where code compliance is needed.
Performance Factors
UV light performance in HVAC systems varies due to a number of interacting factors. Don’t think about precise lamp locations yet. Evaluate the system’s airflow, temperature, humidity and lamp output. These determine the amount of pathogen exposure UV-C provides, either for coil sterilization or air sterilization and will influence operating cost by frequency of bulb and electricity usage.
Airflow Velocity
Check the airstream speed to size lamps output properly. The faster the airstream, the less dwell time and the greater the UV intensity or quantity of lamps required. For instance, a residential coil with a flow of 2 to 3 meters per second might require a single 30 to 40 watt UV-C fixture directed across the coil, whereas a commercial duct at 5 to 6 meters per second would necessitate higher wattage or multiple fixtures distributed along the duct.
Orient lamps perpendicular to air currents so that zipping microbes are exposed to the longest possible UV duration. Try not to position lamps in turbulence zones, such as immediately downstream of sharp bends or mixing dampers, because chaotic flow forms pockets that bypass the UV field and reduce germicidal efficacy.
System Temperature
UV lamp output and lamp life are both responsive to ambient temperature. Some mercury-vapor UV-C bulbs provide peak output close to particular operating temperatures. Cold or very hot plenum conditions can reduce output or life. Place lamps in locations where temperature is consistent, like in the return plenum or directly at the coil face where airflow tempers heat fluctuations.
Avoid placing fixtures near additional heat sources such as reheat coils or adjacent motors, which can cause the bulb to burn out faster. Keep an eye on season-to-season temperature. If a system upgrade alters your thermal profile, reconsider your lamp choice and placement to maintain consistent disinfection.
Ambient Humidity
High humidity encourages mold and can dull UV penetration by giving surfaces a water film. Position UV lamps where moisture tends to accumulate, usually the indoor coil and surrounding drip pans, to eliminate mold at the source. In areas with consistent humidity over 60%, pair UV with dehumidification to reduce mold and dust mite environments and maximize UV efficiency.
Monitor relative humidity on a regular basis. Spikes may necessitate relocating lamps closer to wet surfaces or ramping up lamp output until you can get the environment under control.
Lamp Intensity
Opt for bulbs with ample wattage and a calibrated 253.7 nm UV-C emissions for germ-slaying. Match lamp strength to duct size, airflow and distance of exposure using manufacturer UV charts. Swap bulbs on a schedule—most are good for one to five years—because output drops even as lamps still shine.
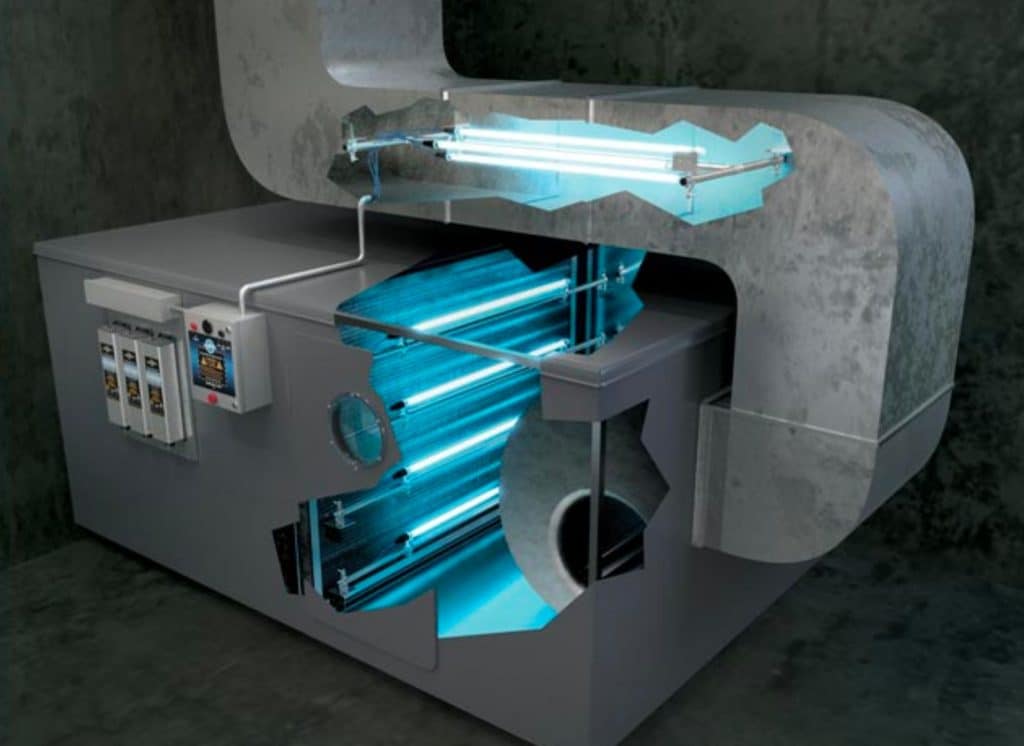
For larger or commercial systems, opt for higher-performance arrays that are designed for sustained output. Anticipate a continuous electricity bill and occasional bulb replacement. Regular performance checks maintain coil protection and air sterilization, so reposition or upgrade bulbs when HVAC modifications change airflow, temperature, or humidity.
A Holistic View
A holistic view sees UV-C placement in an HVAC system as one piece among a network of variables that control indoor air quality. Think about the physical placement of ducts, the psychological comfort residents receive from seeing their space clean, and environmental objectives such as energy efficiency and sustainability.
This is where you break down boundaries, synergies, and processes that need to exist to make UV-C work in the long run.
UV-C Limitations
UV-C does not get rid of dust, particulates, or chemical odors. It kills the germs it contacts, but it leaves all other inert dust and fumes alone. Even a lamp that is too far from the airstream, that is installed with inadequate line of sight, cuts dose and kill rate.
Intricate duct runs, bends, and equipment with dead zones will protect microbes; some surfaces will never get enough UV dose. Don’t depend on UV-C alone where contamination is heavy, like industrial effluent, huge dust loads, or deep, old mold. These require focused cleaning, filtration, and sometimes remediation beyond disinfection.
Filtration Synergy
Combine UV with premium filters to photograph what light can’t. HEPA or true high-efficiency filters, as well as well-made electrostatic options, trap particles that UV leaves behind. Change schedules matter: clogged filters reduce airflow, lower UV exposure time per unit volume, and can make lamps less effective.
Here’s a quick checklist for lamp-and-filter maintenance.
- UV Lamp and System Care: Inspect lamps biannually. Replace per manufacturer hours, often 9 to 12 months. Wash lamp sleeves carefully to prevent fraying. Check ballast and power conditions and record operating hours.
- Filter Checklist: Note filter MERV or HEPA rating; change per runtime and season, typically every 3 to 12 months. Consider the whole picture. Monitor pressure drop to locate restrictions.
- System Monitoring: Track airflow, lamp intensity (if sensors are available), and filter pressure drop. Maintain service records.
Ventilation’s Role
Dilute indoor pollutants with increased fresh-air intake and UV-C then works on a reduced load. Balance is key: too much outdoor air in hot or cold climates can strain HVAC and change humidity.
Integrate energy recovery ventilators where possible. Ventilation and UV kits should be commissioned as a set so airflow, lamp placement, and control logic align. I would use exhaust fans and open vents to decrease local humidity and minimize the likelihood of mold in vulnerable spaces such as bathrooms.
When updating ventilation, strategically plan UV placement to treat key surfaces and airstream where microbial growth is most probable. Monitoring CO2, humidity, and particulate counts assists in validating the bundled approach is effective.
Table: Air purification & HVAC maintenance strategies
- UV-C: Microbe inactivation needs line of sight and requires lamp replacement.
- Filtration (HEPA/MERV): Particle capture, regular change, prevents airflow loss.
- Ventilation: Dilution of contaminants, humidity control, energy impacts.
- Cleaning/Remediation: Surface mold removal, dust control, chemical source removal.
- Monitoring: CO2, RH, pressure drop, lamp output, routine logs.
Safety & Maintenance
UV light can reduce microbial load in HVAC systems when installed and serviced appropriately. Take rigorous safety measures before the work even starts and combine these with a defined maintenance schedule so systems remain efficient and secure in the long run.
Exposure Risks
UV-C exposure to skin or eyes can cause burns and eye injury. Never look at an energized lamp and avoid bare-skin exposure during operation. Others use lamps emitting around 254 nm, which is effective against microbes and is preferred because it limits ozone formation compared with wavelengths below 200 nm.
Put up obvious warning labels at access points and on panels to remind techs and occupants of the danger.
Safety & Maintenance Install safety interlocks, shields and remote power switches so lamps shut off automatically when panels open. Lock or restrict access to UV lamp compartments and keep untrained staff out. Make sure any installed shielding doesn’t affect airflow or coil sterilization efficacy.
Routine Upkeep
- Clean lamp sleeves, reflectors and adjacent coil surfaces routinely to avoid dust and film buildup that absorbs UV and decreases intensity.
- Check mounting brackets, ballast housings, and electrical connections for loose fasteners and signs of wear or corrosion.
- Check lamp function periodically, at least once a month, by looking for the characteristic blue glow and using a UV-C meter when accurate output measurements are desired.
- Track every maintenance activity, date, lamp hours, and parts replaced to provide warranty support and monitor performance.
- Once a year, check ballasts and wiring for initial signs of heat damage, insulation breaks, or corrosion that may cause failure.
- Keep an eye on utility costs like electricity and plan for occasional bulb replacements.
Clean coils during lamp maintenance to get the full benefit. Dirty coils block UV and lower system efficiency. Use soft cloths and mild cleaners, not abrasive scrubs, which can scratch lamp sleeves or reflectors.
Bulb Replacement
Replace bulbs according to manufacturer recommendations, usually every 12 months or earlier if output diminishes or lamp burnout occurs. Maintain shape with care. Use only approved, compatible replacement bulbs to maintain the proper wavelength and intensity.
Mismatched lamps can underdeliver or generate ozone if they emit below 200 nm. Dispose of old bulbs safely in accordance with local regulations, especially those that contain mercury. Most places have special recycling or hazardous waste avenues.
After new lamps are installed, reset timers or service indicators so the next replacement interval is accounted for. Have spares on hand to minimize downtime, and remember that coil sterilization and air sterilization systems have different lamp quantities and access requirements.
Conclusion
UV light placement in HVAC system Position lamps in the air handler close to cooling coils and drain pans for maximum impact. Install a second set in return ducts if the system serves numerous rooms or operates for extended hours. Check lamp wattage and airflow to room size and duct speed. Clean lamps and change on schedule. Use safety shields and switches to protect people during service.
For a single-room office, one coil-mounted lamp typically does the trick. For larger buildings, coil and duct lamps work better in conjunction. Monitor efficacy with surface swabs or filter tests. Consult with a qualified HVAC technician to customize lamp type, quantity, and controls for your specific system.
If you’d like, I can look over your system details and suggest a placement plan.
Frequently Asked Questions
What is UV-C and how does it work in an HVAC system?
UV-C is a form of ultraviolet light (200–280 nm) that inactivates microbes by damaging their DNA or RNA. In HVAC, it decreases mold, bacteria, and viruses on coils and in air streams, enhancing air quality and system efficiency.
Where is the best place to install UV-C in an HVAC system?
Place UV-C near the cooling coil and drain pan to disinfect surfaces and inhibit mold. A second installation in the air handler or ductwork helps to sterilize airborne pathogens.
Can UV-C improve HVAC efficiency?
Yes. UV-C maintains heat transfer efficiency by keeping coils clean and mold free. This can reduce energy consumption and maintenance frequency if properly installed and maintained.
Are there safety risks with HVAC UV-C lamps?
Direct exposure to UV-C can damage skin and eyes. Lamps have to be used in enclosed fixtures or shielded. Employ safety interlocks and adhere to manufacturer guidelines to reduce risk.
How often should HVAC UV-C lamps be replaced?
Change lamps usually no more often than every 9 to 12 months, manufacturer specs vary. UV output diminishes over time even if the lamp still illuminates. Routine replacement helps maintain consistent microbial control.
Do UV-C systems eliminate the need for filters?
No. UV-C supplements filters but doesn’t supplant them. Filters catch fluff. UV-C inactivates microbes on contact and in air. Use both for superior indoor air quality.
How do I verify UV-C performance in my HVAC system?
It recommends measuring microbial loads, inspecting coil cleanliness and using UV intensity meters. Have professionals come out every so often to make sure that it is properly placed and that the output is proper.